Book Binding Workshop 1
- Oct 30, 2019
- 2 min read
Updated: Nov 11, 2019
In this workshop we learnt Simple Pamphlet binding and W fold pamphlet binding. We used our prints that we had made over the past few weeks and Incorporated them into the book.
Step by step: Simple pamphlet binding
1.
Fold your specified size of paper, that you want use as the pages, in half using a bone folder to create a clear fold. (The paper will fold cleaner if you a folding with the grain)
2.
Choose the paper you want for your cover (front and back) making sure its the same width but longer in length by a quarter.
3.
Place your pages inside the cover and using a needle pricker create three evenly spread holes through the crease of each page.
4.

Then, with a waxy thread and a needle go through the centre hole from the centre of the book, then thread through another hole through the back and then down the last free hole pulling tight each time. For the final step poke the needle through the centre hole from the back. Leave enough thread to knot.
5.
Knot the thread around the centre thread and make sure everything is tight.
6.
Fold the cover flaps so they are the same length as the pages, using a bone folder to keep the crease neat and use a small amount of making tape to keep in place.


Step by step: W-fold pamphlet binding
1.
Fold two sections of pages with a bone folder.
2.
Then, fold the cover leaving three centimetres on one side and do the same to the other side.
3.
Loosely fold the centre inwards to make a 'w' shape. Then use a bone folder on the inside to make a clear crease.
4.
Bulldog clamp the pages into place but one section either side of the centre point in the 'w' fold.
5.
Place the book on the side of a table and make the pages (not the cover) point at 45 degree angle from the edge. Use the pricker to pierce three holes through both section of paper. Use your finger to feel when the pricker has gone through.
6.
With waxy thread and needle sew through the same way as a simple binding. (The 'w' fold means the stitch won't be visible on the outside.)


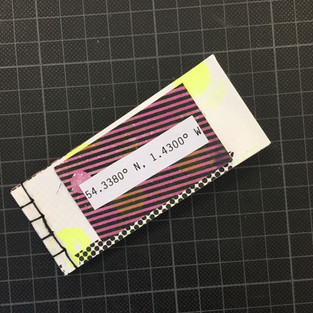
Further Development - Stab binding
I then went back for extra binding to learn how to do a stab binding. I had an idea in cutting up one of my prints and showing the most interesting textures in sections. It had a map printed over so I named the book of the coordinates of the map which showed Northallerton and it's area.
Step by step: stab binding
1.
Cut up the strips of paper of the cover and the pages.
2.
Clamp the pages together with bulldog clips.
3.
Use a pricker to punch four holes into the paper.
4.
Get waxy thread and a needle and follow this pattern in threading:


Comments